Automated Solutions for FrameMaker..

Hello FrameMaker users and Friends,

Too much of travelling kept us busy last fortnight. Was taking a look on the Framers list and found an interesting problem to solve- Link.

This script pulls out information on Paragraph, Character & Table tags from the active document and displays it in a HTML report.

HTML Tag Descriptives Report

Tag Descriptives Report

The report has three sections:

  1. Paragraph Formats
  2. Character Formats
  3. Table Formats

Each listing down different tag definitions and some associated properties for each tag in the document.

You can modify the script to add fields that are important to be captured in the report.

Overall a nice report to keep track of all tags and the related info in one report. We found it very useful while designing templates for a project. Hopefully anyone using this script will derive some benefit using this report.

Download the extendscript here (Right click and Save as) and rename pdf to jsx- TagDescriptives.jsx

Feel free to share your thoughts on it.

framegurus
email:framegurus@gmail.com

Something that the FrameMaker Users should be boastful about !!

Got to know about the important role of documenting the discovering the God particle was entrusted upon our dear tool-FrameMaker. Glad to be associated in some way to this great discovery by mankind.
For Physics enthusiasts this is a great video explaining a nice deal of what the Higg’s Boson is:

More Info on Higgs Boson can be read here: http://en.wikipedia.org/wiki/Higgs_boson

Hope you had an opportunity to go through the Reviews on FrameMaker 11. List of all reviews have been documented in a single post on the Adobe’s blog.

FrameMaker11

FrameMaker 11

The news is abuzz about the launch of Adobe FrameMaker 11.

We evaluated some of the new features and have a good word to share about most of them. We thought of documenting the new features and capabilities in FrameMaker 11 so that we could share it with the entire community. And have some feedback too!


  1. Multiple views for XML Authoring
  2. .. With the aim of breaking the cocoon of not being recognized as a complete XML editor, the multiple views(WYSIWYG, Author, XML Code) in the latest version of FrameMaker serve an apt reply to all those who did not recognize the XML capabilities in FrameMaker

    .. more

  3. Smart Paste structured content from alternative sources directly to valid XML elements. Easy migration from HTML and Microsoft Office applications.
  4. .. Do you author in DITA ? Need to assemble your content from various sources(HTML, Word etc.)? “Smart Paste” offers a great and a quick solution.

    .. more

  5. Improved Ctrl shortcuts– Hierarchical and much more usable
  6. .. Real productivity improvements can be realized using one of the greatest feature in Framemaker history-the Ctrl shortcuts, in a brand new Avatar. FrameMaker 11 redefines control keys aka “Quick Catalogs“.

    .. more

  7. Print ready DITA Publishing along with cover pages, TOC and Index etc.
  8. .. For the authors that author in DITA standard and love the FrameMaker book capabilities, this is a feature to appreciate. Hopefully it would reduce the post processing effort which organizations commonly spend on publishing ditamaps from FrameMaker.

    .. more

  9. Ready and customizable Banner Text (document skeleton) for new DITA XMLs with instructional placeholder content. Basically powered from the EDD.
  10. .. If the authors in an organization need to be guided on what context each element in a structured application holds, then this is a great feature. For template designers, this is a feature that should definitely be explored because they can place a basic structure along with helpful information for authors who start authoring an XML.

    .. more

  11. Object Style Designer saves lot of manual effort.
  12. .. Have you commonly encountered scenarios where you have multiple images and you wanted to apply some common settings across all of them? Earlier you would have modified each one individually. Object Style Designer(OSD) in FrameMaker 11 solves it well by doing it all in one go!

    .. more

  13. Hotspots enable markup of content while adding active links to related sources.
  14. .. Add life to your ‘so far’ dead content by adding active links to relevant content anywhere in your document! Now it will be possible to add links to any parts of an object/image and take the reader to where he would find more information on that object/image part.

    .. more

  15. Revamped New XML/Preferences Dialogs.
  16. .. Recent releases of FrameMaker have tended towards being feature heavy. A number of these come along with a lot of configuration parameters. Some reach the ini files and some make it to the UI dialogs. FrameMaker 11 seems to have taken the first baby step towards providing all such preferences under one roof.

    .. more

  17. 3D and Multimedia interaction
  18. .. The Adobe team realizes well that the future of technical communication lies in the rich media and 3D direction. And they sure have attempted to address some new requirements from the users of such building blocks.
    The play, stop and and capture frame functionality in supported video formats, to be later used as the poster image when the file gets published to PDF, is also a time-saver and helps create better looking outputs.

    .. more

  19. Line Numbers-a helpful feature but a bit half baked. Tables are totally ignored, could be a bug, but it seems the Adobe folks realize this. We too agree that even without finesse, the feature does address the basic requirements of a user.
  20. The ability to view line numbers in a document being authored was long overdue. Good to find it in FrameMaker 11.

  21. Workspaces
  22. Lot has been heard about the workspaces in FrameMaker – the benefits and the pain points. In FrameMaker 11, a user can manipulate UI options by editing the workspaces files(cfws, cfg).

  23. More to come …

We continue to spend time with the new features in FrameMaker 11 and plan to post elaborately on each individually. Hope it will be useful for everyone!

Most features will impress you when it comes to the thoughtfulness behind them and hopefully address most requirements that the users would have wanted.

We encourage you to go ahead and download the trial version from the official download page: http://www.adobe.com/products/framemaker.html

The Adobe team realizes well that the future of technical communication lies in the rich media and 3D direction. And they sure have attempted to address some new requirements from the users of such building blocks.

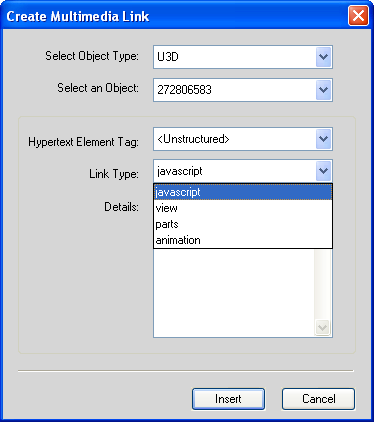
With FrameMaker 11, author can insert links to multimedia and 3D objects. We really like this option of custom controls using hyperlinks. Following linking options have been provided:

  • View: Show/invoke different object views
  • Parts: Show/invoke different object parts
  • Animation: Show animation
  • JavaScript: Associate custom JavaScript code to the link
Create Multimedia Link Dialog

Create Multimedia Link Dialog

Additionally, there is an option to create a link table to graphics (with type as views, parts or animation). This feature really adds much more interactivity to multimedia objects in pdf.

The play, stop and and capture frame functionality in supported video formats, to be later used as the poster image when the file gets published to PDF, is also a time-saver and helps create better looking outputs!

With the aim of breaking the cocoon of not being recognized as a complete XML editor, the XML views in the latest version of FrameMaker serve an apt reply to all those who did not recognize the XML capabilities in FrameMaker.

Following three views have been incorporated for technical communicators who author XMLs:

1. WYSIWYG View

The USP of the product. Its WYSIWYG capability, that no other authoring tool provides. Authors will use this view to create and apply styles, modify layouts and page related settings like master pages for XML files. Moreover, the entire structured application creation and update workflows will be done in this view.

2. Author View

The view relevant for an author; devoid of everything related to print output aspects, to retain an author’s focus on just creation of content.

Author View

Author View

This content in this View is reflows according the document size. It is also devoid of the ability to view/apply Master Pages, so you would not see the multi-column layouts from your templates in the XML being authored.
We noticed a lot of menus and toolbar restricted in this view. Probably all those features that are meaningless in this view have been eliminated. Less clutter is better experience!

3. Code View

A view for advanced XML users who are conversant with XML, the code view, is packed with useful features like XPath and XSLT. A new tree based XML structure window is available in this view. However, we miss the power provided by the Structure View (available in WYSIWYG and Author View). On some serious thinking it’s absence starts to make sense as well.
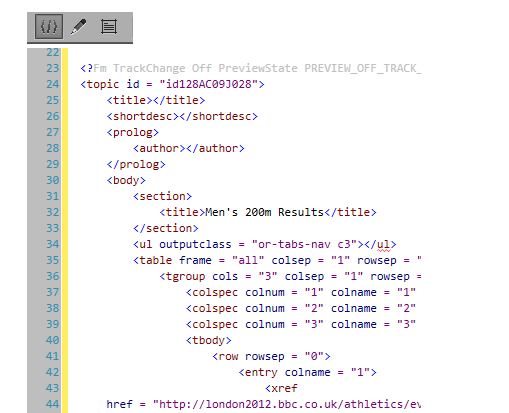
XML view

XML view

Noticed some good authoring features in this view like attribute suggestions, auto-element-tag-closure and run-time validation against the DTD specified in the XML. Moreover, the XML open time in this view is much less compared to the other 2 views, probably because there’s no worry to display the WYSIWYG face of the document in the Code View.

Most importantly, the switching experience between views is smooth. While authoring in Code View or Author View if you want to verify the final print output, you can do so by just switching to WYSIWYG view. Just a mouse click does that for you!

Recent releases of FrameMaker have been power packed with lot of features. A number of these come along with a lot of configuration parameters. Some reach the INI files and some make it to the UI dialogs. FrameMaker 11 seems to have taken the first baby step towards providing all such preferences under one roof.

FrameMaker 11 has moved the option for preferences from File menu to Edit menu. Whats new here is the revamped user interface! Instead of having multiple dialogs (one for each set of configurations for general, interface, dictionary, CMS etc), everything has been consolidated into one single dialog which looks good and user friendly. Would also like to see more frequently used options (specially DITA and DITA publish) from INI files moved to this dialog.

Edit Preferences Dialog

Edit Preferences Dialog

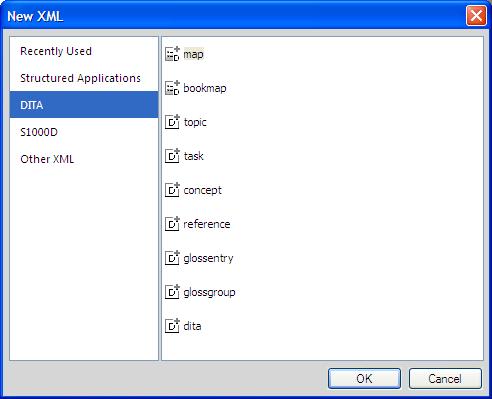
On the same lines, all the options of creating a new XML has been moved to one dialog, the File..New dialog. You will also find your custom applications available in this dialog. Definitely, it is much better and easier to create new XMLs as compared to the earlier versions!

New XML Dialog

New XML Dialog

Add life to your ‘so far’ dead content by adding active links to relevant content anywhere in your document! Now it will be possible to add links to any parts of an object/image and take the reader to where he would find more information on that object/image part.

Another feature which adds interactivity to objects in pdf. Although the name “hotspot” looks little weird, this feature is certainly very useful. We gave a quick glance to this new feature and it worked well! What we did was:

  • Imported an image (with circles and squares)
  • Created a “Named Destinations” hypertext on another page
  • Turned the hotspot mode to ON (last icon in Graphics toolbar)
  • On the image, from the Graphics toolbar, we created a square overlapping the square in the image.
  • Linked the square to the named destination (from hotspot properties, that launched automatically!)
  • Similarily superimposed a circle over the circle in the image
  • Linked the circle to a URL (from hotspot properties), say http://www.google.com
  • Made the pen, fill pattern of the square/circle to “None”
  • And whew! In the PDF perfect links were created.
hotspots

Hotspots

Certainly, a lot more interesting stuff can be done through this little new “hot” trinket!

Have you commonly encountered scenarios where you have multiple images and you wanted to apply some common settings across all of them? Earlier you would have modified each one individually. Object Style Designer(OSD) in FrameMaker 11 solves it well by doing it all in one go!

Just like paragraph and character styles, FrameMaker allows you to create an Object Style with various properties using OSD.

In previous versions, users would apply the graphic properties individually on objects from the graphic toolbars. OSD stores these styles that can be applied in single step from the “O” catalog over the objects.

Object Style Designer

Object Style Designer

OSD is completely different from the other designers in look-n-feel (don’t know why it was implemented this way!). These inconsistencies in different features across FrameMaker is a major nuisance. Adobe team should give some thinking to make it better.

If the authors in an organization need to be guided on what context each element in a structured application holds, then this is a great feature. For template designers, this is a feature that should definitely be explored because they can place a basic structure along with helpful information for authors who start authoring an XML. An instance of which can be seen while creating new DITA XMLs.
The term banner text looks misleading but this feature is about having placeholder content inside elements that guides the author with some text.

For example, we did a File .. New .. XML .. Dita Topic. It showed “banner” text in grey color, on which we could just click and start typing (it informs authors to type in the correct context), while the placeholder content vanishes.
So it actually guides the author in two ways:

  • Where exactly to start authoring content in a document.
  • Setting the context right for what context to author in.
banner text

Banner Text

Moreover, we foresee common usage where the placeholder can contain some warning/essential prerequisites that the author should be aware of. The Help guide says that you can extend this to content other than DITA too! (via EDD).

For the authors that author in DITA standard and love the FrameMaker book capabilities, this is a feature to appreciate. Hopefully it would reduce the post processing effort which organizations commonly spend on publishing ditamaps from FrameMaker.
In FrameMaker 11, users can now generate print ready output from a DITA Map project. Essentially the ditamap to Book with FM components workflow has been enhanced in the latest FrameMaker release.

DITAMap saved as Book

The output would now now also include generation of cover page, ToC, Index, List of figures, List of tables etc.

Book with TOC, Index etc. published from FrameMaker

These properties are configurable in the ditafm-output.ini file (%appdata%\Adobe\FrameMaker\11). Numbering and pagination are  automatically handled as part of this book building process.

Many options are present in this ini file. We did not use all, but it goes to show a lot many parameters, left upon the user to configure as per the publishing requirements. For example, numbering notation for chapter, section and sub section components, Pagination (double sided or single sided) and presence of an option to generate flat books (pre-FrameMaker 9 era). And trust me a lot more to explore in this ini.

A few examples of entries in the ini file:

[BookWithFM-General]
PerformPostProcessing=1
GenerateFMComponentsAtOneLoc=1
GenerateFlatBook=0
GenerateTOC=1
GenerateIndex=1
ApplyOutputTemplate=1
OutputFilesOrder=BookTitle|TOC|Files|ListofFigures|ListofTables|Index


[BookWithFM-Chapter]
PageNumberingFirst=Restart
;PageNumberingFirst=Restart|Continue|ReadFromFile
PageNumberingFirstValue=1
PageNumberingDefault=Continue
;PageNumberingDefault=Restart|Continue|ReadFromFile
Pagination=DoubleSided
;Pagination=DoubleSided|SingleSided
PageRounding=DontChange
;PageRounding=MakeEven|MakeOdd|DontChange|DeleteEmpty
FirstPageSide=NextAvailable
;FirstPageSide=ReadFromFile|NextAvailable|Left|Right

This ini file seems very long and is undocumented. Looks like users will need to figure out the meaning of the individual options themselves 😐